This posting diverges from my typical posts, being more about my approach to improving efficiency on something I do routinely enough.
Over the last decade, I have spent inordinate amounts of time on genealogy; with 9000+ people in my part of a larger tree including many, I can prove via DNA. A lot of this is quite efficient via the Ancestry website, it’s easy to find records and digital copies of events and people.
Purchasing certificates to prove birth and death is expensive, so it’s fairly normal to work out who the person is and reference the birth-marriage-death indexes for which a large part exists freely for the UK on FreeBMD (crowdsourced).
Alas, records available on Ancestry and FreeBMD unfortunately, do not confirm the mother’s maiden name prior to 1911.
This is a very big deal, as it helps prove you’ve found the record for the correct child (having worked out the mother and father). Luckily in recent years, the UK government made available data that was previously used by the general records office to find people when requests for certificates are received. That website is GRO.
It’s free to register, and after log in, you can pick “Search GRO Online Indexes”. You then attempt to find the person of interest whilst praying the record was legible to whoever digitised it, which usually it is and a job well done by GRO.
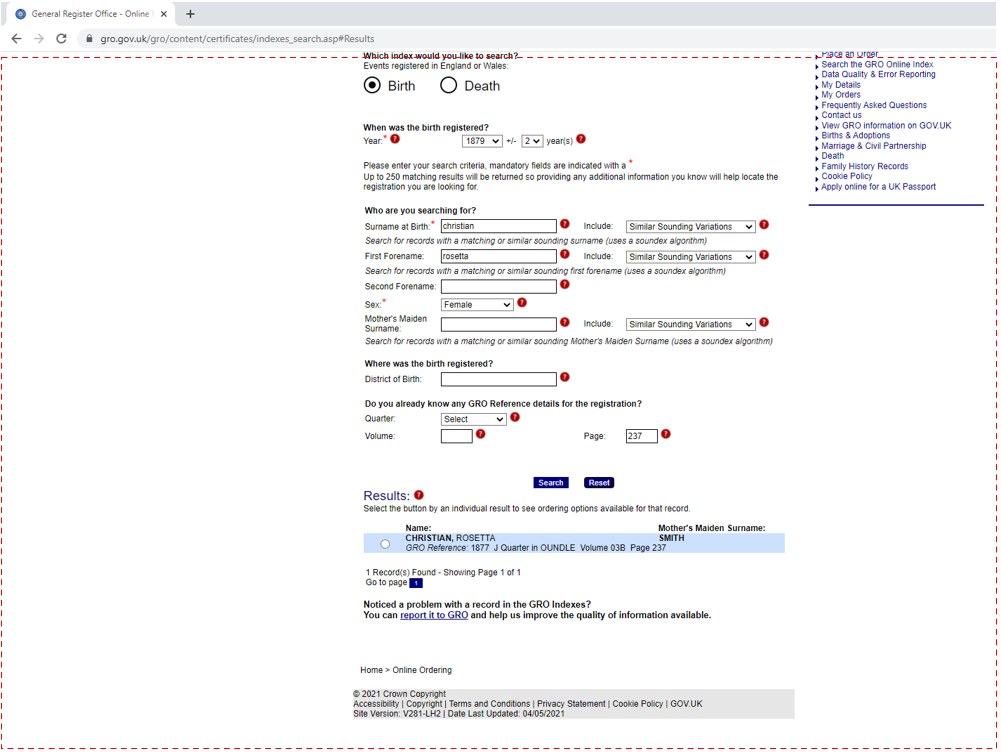
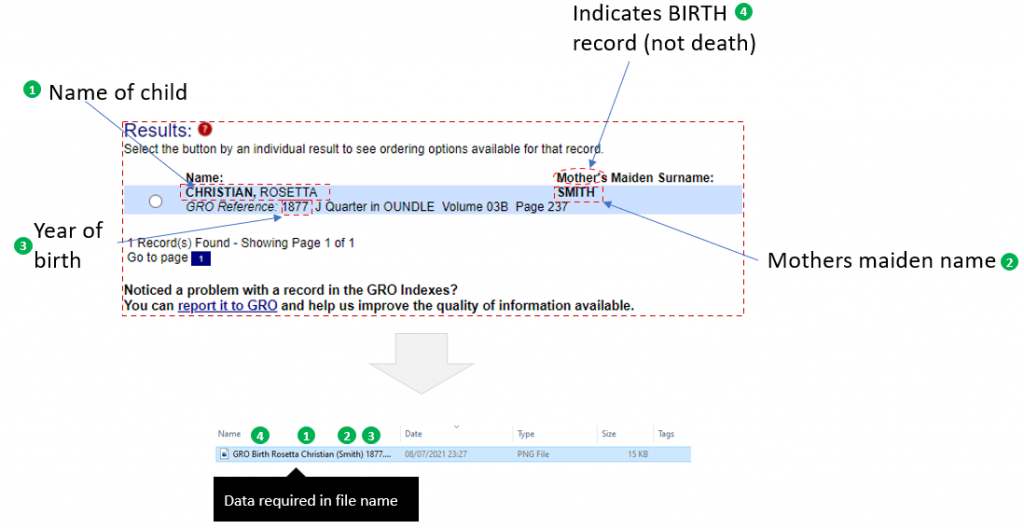
Here’s one I did earlier (images from a slide deck I prepared):
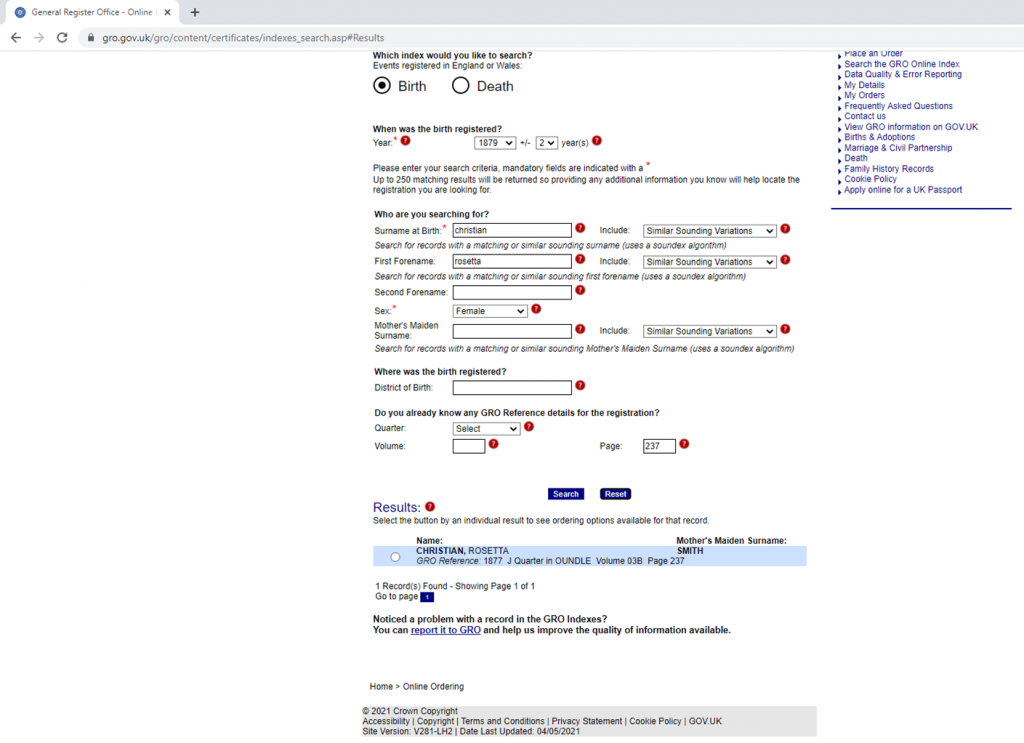
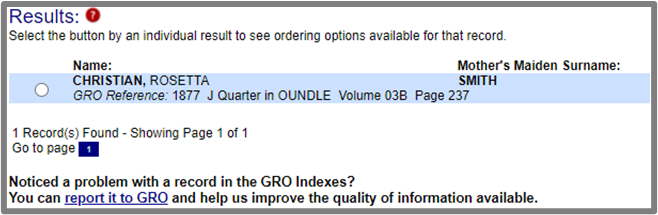
That record tells me Rosetta is the child of Mr Christian and Mrs Smith, when and where the birth was registered. What I then do is clip part of the record from the screen, like this:
To date, I’ve done more than 2000 of them! And trust me it’s time-consuming / laborious.
It’s especially hit-and-miss doing it with the “Snipping Tool” if you care that they are done consistently. Being autistic, I was getting a little fed up with the inaccuracy of doing it manually, so I built a small application – that’s what this post is about.
Not only is snipping painful, the next part is too – I always save the file with a consistent name/format like this one:

For a birth record, the file-name tells me it came from GRO, the persons name, mother’s maiden name in brackets, as well as the date.
Death records are a slightly different format, and so we have to detect which before parsing.
Lastly, I paste a particular citation into Ancestry’s upload, which is provided in the clipboard by my application.
The relevance concerning ML/AI is the fact I need to scrape the details out of the record. I hope the approach gives you ideas for your automation. Anyone out there smart enough to do it all using a more clever approach please leave a comment.
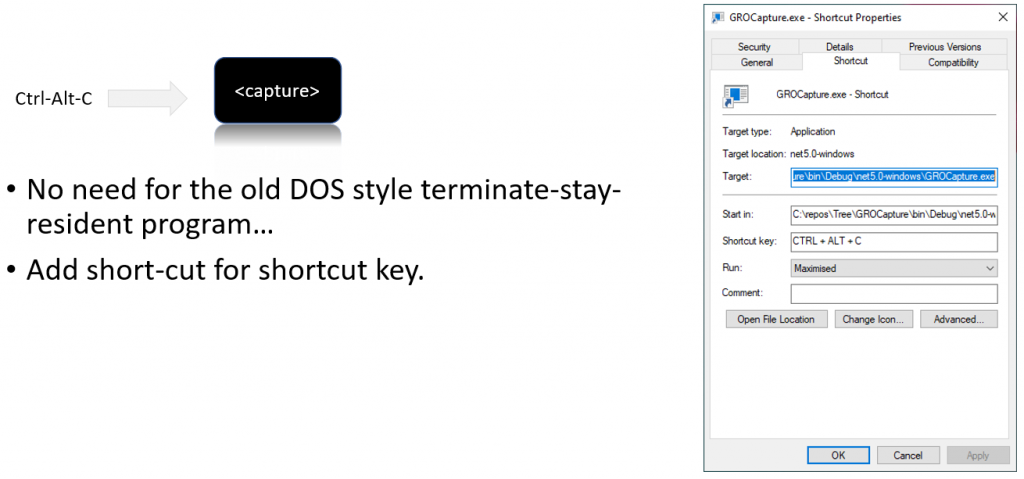
Goal: hot-key > auto-snip > auto-name > auto-save > prime the clipboard.
Step 1 – automatically grab the screen image
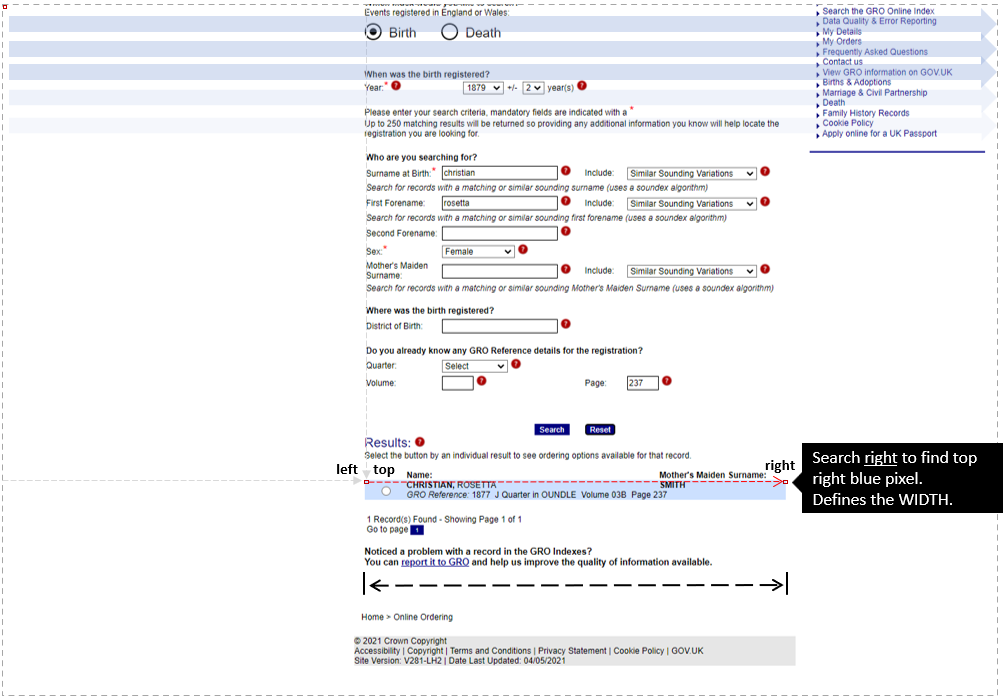
Step 2 – locate the region of interest

Step 3 – determine width of the area to scrape
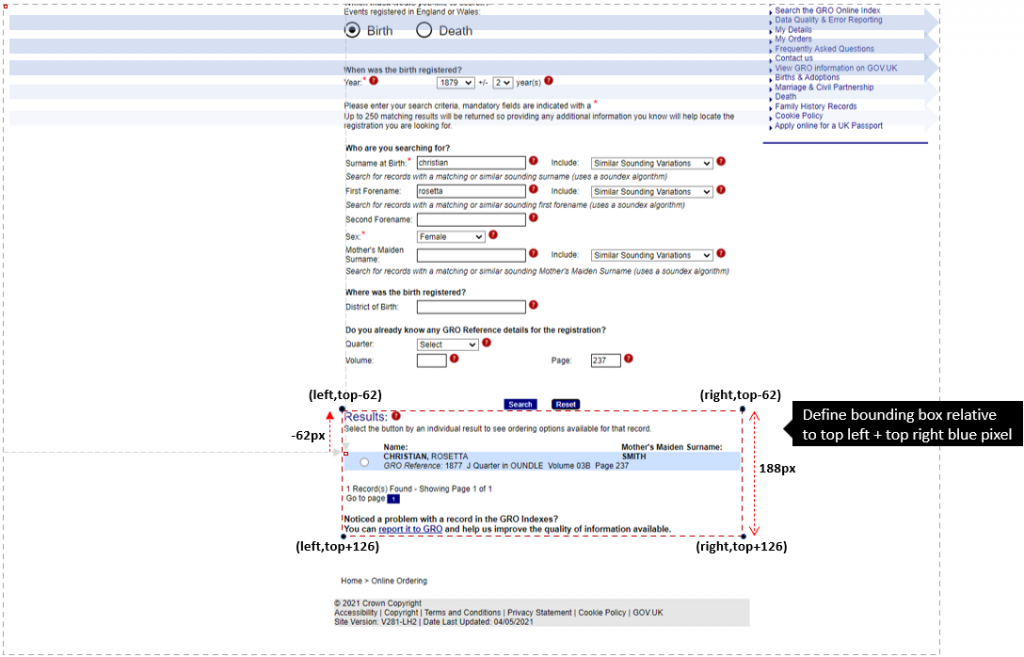
Step 4 – determine the rectangle to clip
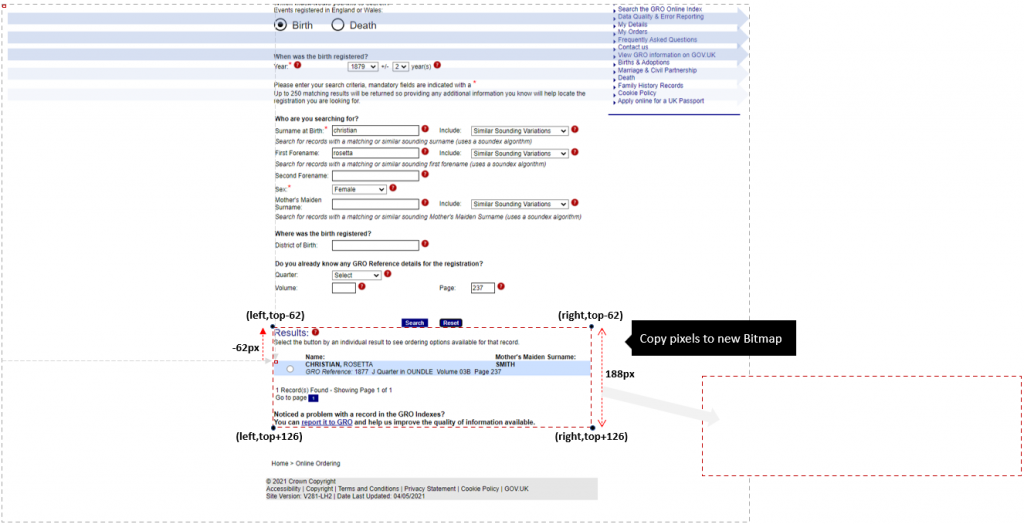
Step 5 – copy the rectangle we want to a new Bitmap
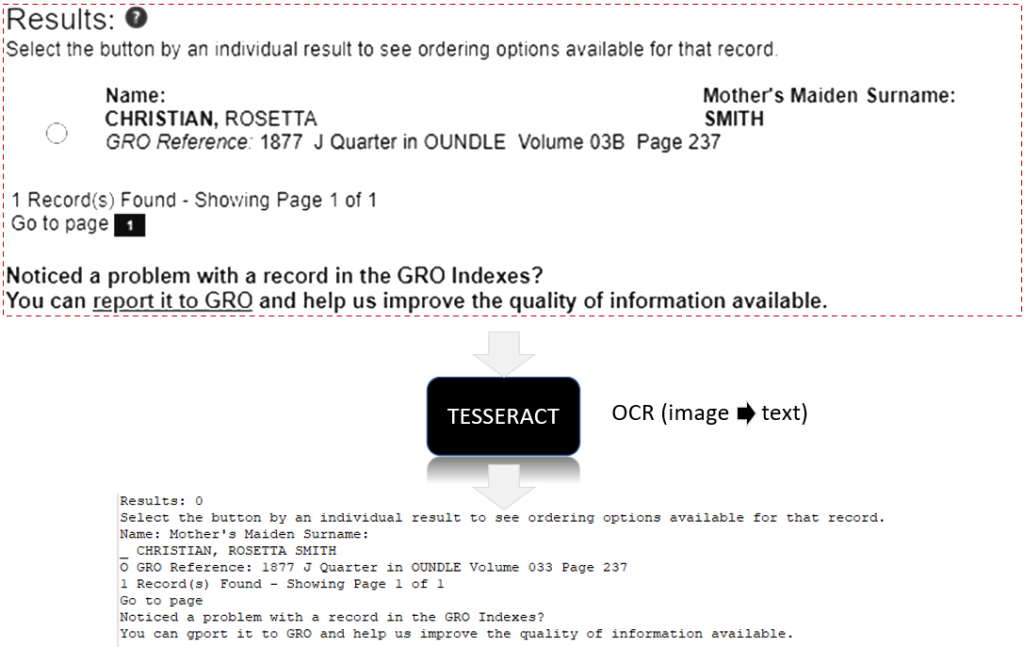
Step 6 – extract the “data” from the bitmap
Before we can extract data we need to pre-process the image and then OCR.
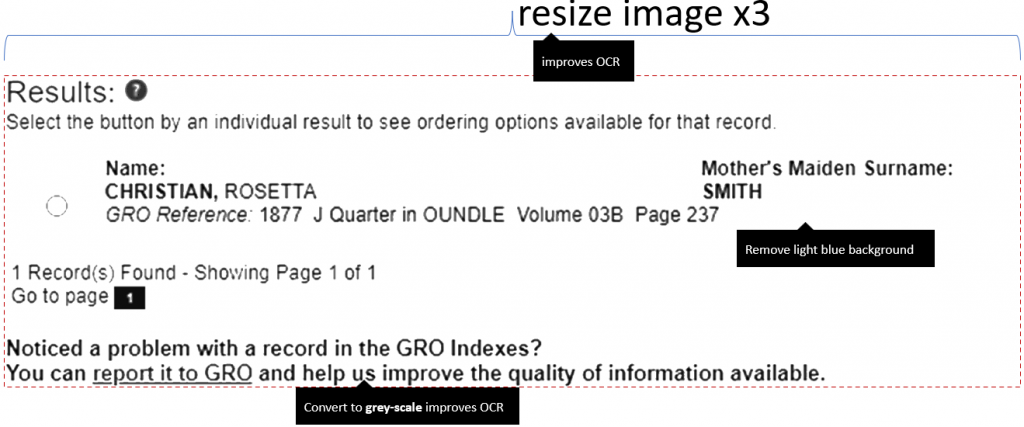
And OCR to turn it to text
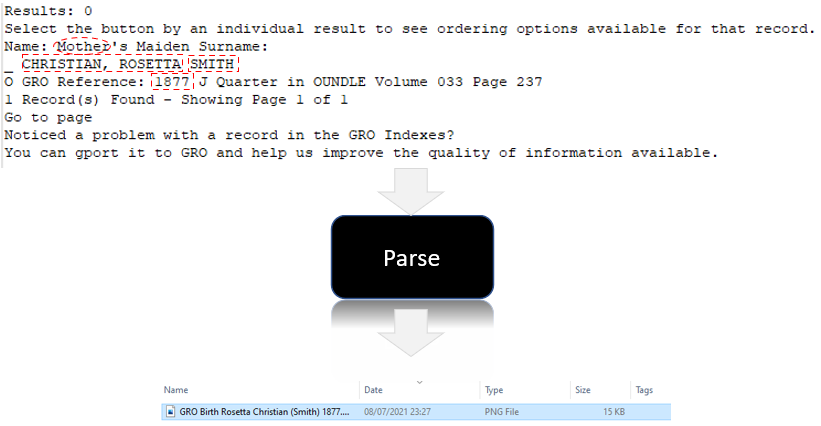
Step 7 – parse the data to generate the correct filename
This bit occasionally fails to provide the correct name accurately due to Tesseract OCR being quirky. For example, sometimes the radio button appears as an “O” yet the line above has a “_”, sometimes it returns multiple rows. We have to contend with mother’s maiden name for illegitimate children having a “-“. Maybe it’s 95%+ reliable, based on heavy usage.
Step 8 – enable a hot key to kick off the process
Improving it further / limitations
- It works as long as GRO use RGB(204,224,255) for the region of interest. If this changes, it won’t work.
- It is dependent on the format of the text remaining consistent in content, positioning, size etc.
- Finding the blue region could be improved by searching every 300 px horizontally / 25px vertically rather than 1px, because the box is 600x50px. Doing so would be quicker on the search, but would require approx. find followed by more accurate honing in.
- Screen resolution (font-scaling) affects the -62px + 126px; so logic needs to search not hardcode offsets. This tripped me up when I tried it on a different laptop; which leads me to the next section.
Finding the blue region not hardcoding regardless of resolution (3rd/4th bullet)
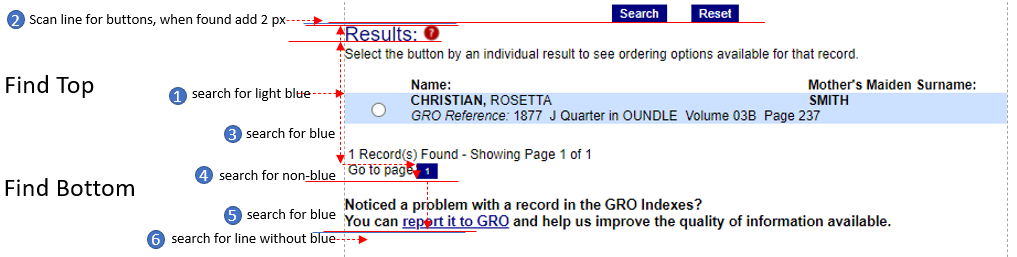
This worked very effectively, it’s not failed, yet. Even when the person has been registered twice erroneously, it scrapes both to pixel precision.
It still has a huge dependency on GRO not inventing a new look.
An alternative approach I considered is to build a browser extension for Chrome. Maybe one day this might be necessary. For now, it works beautifully.
Performing OCR
My first thought was to use Tesseract, and indeed it does use it. However, I came unstuck when I realised Tesseract on Windows wasn’t a thing. On StackOverflow, I came across Patagames.Ocr which is a NuGet library. Up until finding it I had considered making a service that talks from Windows to Linux.
Integration was simple:
// invokes Tesseract to perform OCR
using var api = OcrApi.Create();

api.Init(Patagames.Ocr.Enums.Languages.English);

string text = api.GetTextFromImage(scrapedImage); // this is the OCR text from the image

return text;
I love how little effort it took to integrate, however I subsequently found they charge for it, and this kicks in if the image is within a certain size ranges.
I didn’t have that licensing issue until I found Tesseract can’t even OCR perfectly readable text by Chrome.
After much Googling, I read that Tesseract works better with grey scale than colour, so I wrote the following code to optimise the image and for the best part it now works relatively well (99% but definitely not 100% perfectly). Recommendations were to increase the size of the image (which led to me finding out that Patagames license it).
/// <summary>
/// Modifies an image directly into grey-scale and removes noise in a performant manner (not using get/setpixel of bitmap).
/// </summary>
/// <param name="imageToProcess">The image to process.</param>
/// <returns>(existing image) the input image modified to be grey-scale.</returns>
public static Bitmap MakeGreyScaleThenRemoveNoise(Bitmap imageToProcess)
{
	// Images are made up of pixels, rows of them. In reality they are stored as consecutive entries in a block of memory.
	// The typical is 32bit pixels = 4 bytes [r,g,b,alpha].
	// To access a specific pixel  offset = x * bytes per pixel (=4) + y * number of bytes per row
	// But you have to be careful accessing memory like this. It requires locking it into memory, before reading / writing.

	BitmapData imageToProcessData = null;
	IntPtr imageToProcessDataPtr;

	try
	{
		// lock the bitmap in memory
		imageToProcessData = imageToProcess.LockBits(new Rectangle(0, 0, imageToProcess.Width, imageToProcess.Height), ImageLockMode.ReadWrite, imageToProcess.PixelFormat);

		// this is the offset in the image where the first pixel starts
		imageToProcessDataPtr = imageToProcessData.Scan0;

		int numberOfBytesPerRowOfPixels = imageToProcessData.Stride; // provides the bytes-per-pixel * width
		int numberOfBytesImageOccupies = Math.Abs(numberOfBytesPerRowOfPixels) * imageToProcess.Height; // the number of pixels representing width x height pixels
		byte[] rgbImageDataByteArray = new byte[numberOfBytesImageOccupies]; // a block of memory the bitmap is copied to for reading/editing

		// clone the image into array before modifying it (you cannot read the pixels if you haven't copied them into the array)
		System.Runtime.InteropServices.Marshal.Copy(imageToProcessDataPtr, rgbImageDataByteArray, 0, numberOfBytesImageOccupies);

		int bytesPerPixel = Bitmap.GetPixelFormatSize(imageToProcess.PixelFormat) /* bits per pixel*/ / 8 /* bits per byte */;

		// it'll crash anyway, but let's be sensible and detect it. Why restrict? Because if it's not 4 byte format we have to adjust all the pixel get/set code.
		if (bytesPerPixel != 4) throw new Exception("the code assumes r,g,b,a i.e. 4 bytes");

		// iterate over ALL the pixels (x=0..width, y=0..height)
		for (var x = 0; x < imageToProcess.Width; x++)
		{
			for (var y = 0; y < imageToProcess.Height; y++)
			{
				int offsetOfPixel = x * bytesPerPixel + y * numberOfBytesPerRowOfPixels;

				// extract the RGB from the image
				byte red = rgbImageDataByteArray[offsetOfPixel + 2];
				byte green = rgbImageDataByteArray[offsetOfPixel + 1];
				byte blue = rgbImageDataByteArray[offsetOfPixel];

				// apply noise removal
				if (green == 224)  // 224 = light blue bounding -> white
					red = blue = green = 255;
				else
				{
					if (green == 8) // 8 = blue writing -> black
						red = blue = green = 0;
				}

				// Turn pixel into grey scale, we do it in a way that human's find comfortable. Whether it matters to the OCR is for debate.
				// The weighted method / luminosity method: weighs red, green and blue according to their wavelengths.
				byte grey = (byte)(.299 * red + .587 * green + .114 * blue);

				// anything brighter than this is considered white
				if (grey > 162) grey = 255;

				// 32 bit pixels: blue, green, red, alpha
				rgbImageDataByteArray[offsetOfPixel] = grey;     // B
				rgbImageDataByteArray[offsetOfPixel + 1] = grey; // G
				rgbImageDataByteArray[offsetOfPixel + 2] = grey; // R
				rgbImageDataByteArray[offsetOfPixel + 3] = 255;  // opacity
			}
		}

		// update source image with the grey-scale we put into the aray.
		System.Runtime.InteropServices.Marshal.Copy(rgbImageDataByteArray, 0, imageToProcessDataPtr, numberOfBytesImageOccupies);
	}
	finally
	{
		// if we locked, we unlock
		if (imageToProcess != null) imageToProcess.UnlockBits(imageToProcessData);
	}

	return imageToProcess;
}
For better performance I bypassed GDI, and accessed the image as memory (which it is but GDI hides from you). I do this for all of the processing – it is very fast, including OCR less than a second from CTRL-ALT-C to saving the file.
Improving the OCR image was a bit of a quick “hack”, changing bright regions to white, colours into grey and it removes the light blue bound box. I didn’t waste time checking whether grey as a human perceives is as important to Tesseract (e.g. instead sum[R+G+B]/3).
The takeaway is that it’s possible to manipulate the image to improve Tesseract, but leaves worrying questions why Tesseract fails to OCR clean text.
One of my subsequent postings explains how I taught ML to recognise all the digits in the 300+ fonts I have installed with 100% accuracy. I could train it on the font that GRO use, to OCR it; maybe that will figure in a future blog…
Unfortunately this is one app I sadly cannot share on GitHub, unless you prove to me that you have purchased an OCR license from Patagames.
I hope that you found the approach interesting, if you have any comments let me know!