This relates to the rocket landing post here.
I want to inspire you to have fun learning and playing with AI/ML. Part of this comes from being able to look at your creation and smile. This one brings a smile to my face as I honestly hadn’t expected it to work so well.
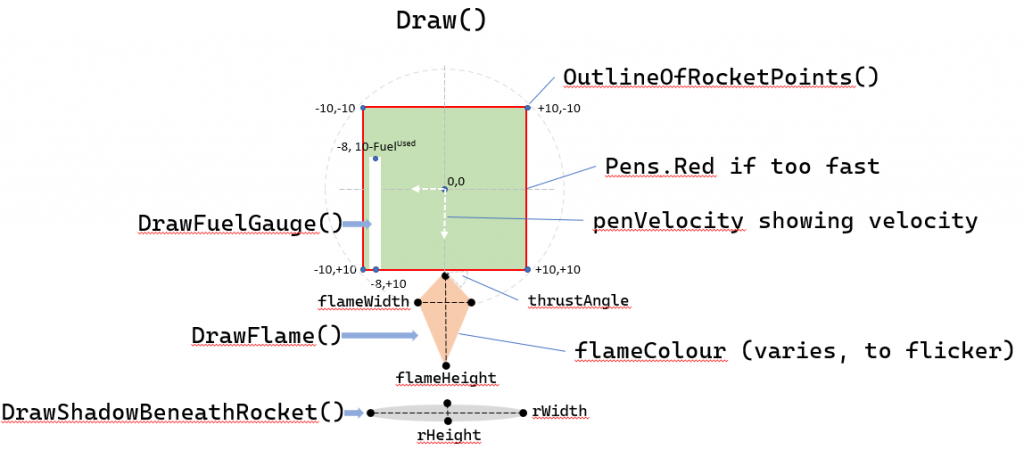
That “square”, why didn’t you draw something fancy? Why has it not got “feet” for landing? Isn’t it a little non-aerodynamic?
I mulled over the first point for quite a while and settled on the square. You can easily make it have a pointy top by changing OutlineOfRocketPoints() and adding one point if you want.
There’s more going on than you thought – right?!
UX problem 1
The ship can rotate; that requires us to construct the ship in a PointF[], and call RotatePointAboutOrigin() to rotate the points. There is a formula for this, luckily you don’t need to know how simply use the function I created!
This rotation is done to ship, and the flame.
UX problem 2
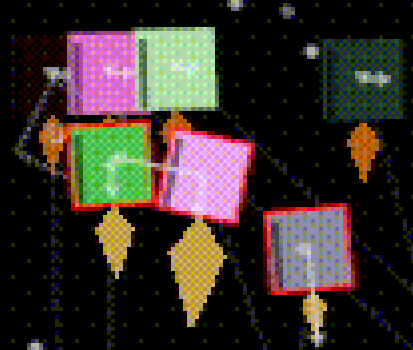
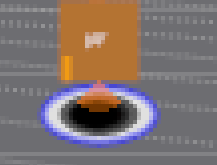
The shadow… Above a certain height, you’re not going to see a shadow. Technically whilst our shadow is convincing enough, it is mathematically inaccurate unless there is a line of light source along the top. i.e., the shadow should vary in shape and offset horizontally from the object depending on the position of the light source. Our purpose is to signify it’s coming down and to identify the ground, for that it’s good enough.
However we still need to make it change size as the rocket gets nearer the ground, here’s our code to do that. I used the alpha transparency to darken it the closer the rocket gets.
/// <summary>
/// Draws a shadow as the altitude goes low enough.
/// It's basically an ellipse that gets larger and darker the nearer the ground.
/// </summary>
/// <param name="g"></param>
/// <param name="floorY"></param>
/// <param name="centerX"></param>
/// <returns></returns>
private void DrawShadowBeneathRocket(Rocket rocket, Graphics g, float floorY, float centerX)
{
  if (rocket.Altitude < 255 && rocket.Altitude >= 0)
  {
     float shadowWidth = 11 * (255 - rocket.Altitude) / 255;
     float shadowHeight = 6 * (255 - rocket.Altitude) / 255;

     int alpha = (129 - (int)rocket.Altitude / 2) + 100;

     g.FillEllipse(new SolidBrush(Color.FromArgb(alpha, 0, 0, 0)), centerX - shadowWidth, floorY - shadowHeight, shadowWidth * 2, shadowHeight * 2);
  }
}
UX problem 3
The flames would look a bit stupid as two static triangles. That would hurt my autistic brain.
So we do several things to improve it:
- We pick one of 3 flame colours at random each time we paint – making it flicker. The colours were chosen after looking at various internet websites for “flame colour”. Alpha helps as flames are see-through-ish.
var flameColour = RandomNumberGenerator.GetInt32(0, 2) switch
{
  0 => Color.FromArgb(150, 253, 207, 88),
  1 => Color.FromArgb(150, 242, 125, 12),
  _ => Color.FromArgb(150, 240, 127, 19),
};

using SolidBrush brushFlame = new(flameColour);
- We turn drawing to “default” which makes it pixelated; we generally draw anti-aliased.
g.SmoothingMode = System.Drawing.Drawing2D.SmoothingMode.Default;
g.FillPolygon(brushFlame, points);
g.SmoothingMode = System.Drawing.Drawing2D.SmoothingMode.HighQuality;
- The flame is proportional to the thrust the rocket is producing, which means we need to adjust the size.
float flameHeight = 20F * (float)(rocket.BurnForce / (rocket.TotalMass * WorldSettings.s_gravity * AISettings.s_AIburnAmplifier));
float flameWidth = flameHeight / 4;
- To complicate matters, we use thrust vectoring (rotating the thruster slightly to change the direction of the rocket) – the centre pink one’s large flame is offset to the right if you draw a line through the square. We have to contend with the angle of the rocket + thrust vectoring angle. All flame points are rotated.
// flame would look dumb if it wasn't in the direction of the rocket. We are also thrust vectoring,
// and therefore need to rotate the flame.
double thrustAngle = rocket.AnglePointingDegrees - rocket.OffsetAngleOfThrustInDegrees * 10;

PointF[] points = { MathUtils.RotatePointAboutOrigin(new PointF(centerX, centerY + 10), new PointF(centerX, centerY), thrustAngle ),
  MathUtils.RotatePointAboutOrigin(new PointF(centerX + flameWidth, centerY + 10 + flameHeight / 3F), new PointF(centerX, centerY), thrustAngle ),
  MathUtils.RotatePointAboutOrigin(new PointF(centerX, centerY + 10 + flameHeight), new PointF(centerX,centerY), thrustAngle ),
  MathUtils.RotatePointAboutOrigin(new PointF(centerX - flameWidth, centerY + 10 + flameHeight / 3F), new PointF(centerX, centerY), thrustAngle ),
  MathUtils.RotatePointAboutOrigin(new PointF(centerX, centerY + 10), new PointF(centerX, centerY), thrustAngle )
};
- You cannot paint a flame below floor level; it’s not fair right? As the rocket reaches the floor we need to flatten the flame (as would happen in real life). As we clip it we spread the flame; I think that is what happens but I am not going to burn my house down trying it for real. Please don’t try it either!
for (int point = 0; point < points.Length; point++)
{
  if (points[point].Y > floorY)
  {
    points[1].X += (points[2].Y - floorY) / 4; // flare the flame
    points[3].X -= (points[2].Y - floorY) / 4;

    // ensure it doesn't go thru the floor
    points[point].Y = floorY;
  }
}
UX problem 4
We want a fuel gauge that changes colour as the fuel is running out; yet again we have to rotate as it is drawn on the rocket. I considered putting it outside (vertical off to the left), but felt it would start to look confusing.
/// <summary>
/// Draws a bar on the lhs, for "fuel" indication.
/// Colour goes black > orange > red (<25%).
/// </summary>
/// <param name="g"></param>
/// <param name="centerX"></param>
/// <param name="centerY"></param>
private void DrawFuelGauge(Rocket rocket, Graphics g, float centerX, float centerY)
{
  PointF[] fuel = { MathUtils.RotatePointAboutOrigin(new PointF(centerX - 8, centerY + 10 - (float) rocket.PctFuelUsed*18), new PointF(centerX,centerY), rocket.AnglePointingDegrees),
                    MathUtils.RotatePointAboutOrigin(new PointF(centerX - 8, centerY + 10), new PointF(centerX,centerY), rocket.AnglePointingDegrees)
  };

  // colour of gauge changes as level drops.
  using Pen gauge = new(rocket.PctFuelUsed < 0.25F ? Color.FromArgb(200, 255, 0, 0) : (rocket.PctFuelUsed < 0.5F ? Color.FromArgb(200, 255, 165, 0) : Color.FromArgb(200, 0, 0, 0)), 2);

  g.DrawLine(gauge, fuel[0], fuel[1]);
}
UX problem 5
To see the vertical and lateral velocity, we draw white arrow indicators; yet again rotate.
using Pen penVelocity = new(Color.FromArgb(100, 255, 255, 255));
penVelocity.EndCap = System.Drawing.Drawing2D.LineCap.ArrowAnchor;

// draw upwards velocity
g.DrawLine(penVelocity,
           new PointF(centerX, centerY),
           MathUtils.RotatePointAboutOrigin(new PointF(centerX, centerY + (float)rocket.VerticalVelocity), new PointF(centerX, centerY), rocket.AnglePointingDegrees+ 180));

g.DrawLine(penVelocity,
           new PointF(centerX, centerY),
           MathUtils.RotatePointAboutOrigin(new PointF(centerX + (float)rocket.LateralVelocity, centerY), new PointF(centerX, centerY), rocket.AnglePointingDegrees));
UX problem 6
Background: We need some landing area bullseyes and a few stars. Well, I say “need”, we don’t need but it leads to a nicer test harness.
Plotting all the scenery in every frame would slow it down. There are 800 stars (no need to count them now); some are larger because they are a tiny bit closer or just bigger and the alpha transparency indicates dimmer/further.
 /// <summary>
/// Draw a bullseye for each target base.
/// </summary>
/// <param name="width"></param>
/// <param name="height"></param>
/// <param name="gbackground"></param>
private static void DrawBaseTargetsAsBullseyes(int height, Graphics gbackground)
{
	// draw the BULLSEYE bases
	if (AISettings.s_fixedBases)
	{
		float floorY = height - 22;

		using Pen bullseyeOuter = new(Color.FromArgb(150, 0, 0, 255), 2);
		using SolidBrush bullseyeWhite = new(Color.FromArgb(180, 255, 255, 255));
		using SolidBrush bullseye = new(Color.FromArgb(220, 255, 0, 0));

		// r-x/y are ellipse radius. Full circles look silly given the ground goes into the horizon, so we scale "y" to make a squashed circle.
		float rox = 28;
		float roy = 0.5F * rox;
		float rbx = 10;
		float rby = 0.4F * rbx;

		for (int baseIndex = 0; baseIndex <= 5; baseIndex++)
		{
			// white ellipse
			gbackground.FillEllipse(bullseyeWhite, GetBaseOffset(baseIndex) - rox / 2, floorY - roy / 2, rox, roy);

			// blue outer circle
			gbackground.DrawEllipse(bullseyeOuter, GetBaseOffset(baseIndex) - rox / 2, floorY - roy / 2, rox, roy);

			// red center dot
			gbackground.FillEllipse(bullseye, GetBaseOffset(baseIndex) - rbx / 2, floorY - rby / 2, rbx, rby);
		}
	}
}

/// <summary>
/// We need to detect when rockets have gone rogued and decided to fly into outerspace.
/// To make it obvious in the UI, we draw an arbitrary line.
/// </summary>
/// <param name="widthOfCanvas"></param>
/// <param name="gbackground"></param>
private static void DrawLinesDelimitingSpaceWithAir(int widthOfCanvas, Graphics gbackground)
{
	// draw - - - - - - indicating the point at which rockets are deemed to be escaping the atmosphere
	using Pen ceilingPen = new(Color.FromArgb(10, 255, 255, 255));
	ceilingPen.DashStyle = System.Drawing.Drawing2D.DashStyle.Dash;

	gbackground.DrawLine(ceilingPen, 0, 50, widthOfCanvas, 50);
}

/// <summary>
/// Ground is a rectangle with some horizontal lines, and lines receding into the horizon. Nothing fancy.
/// </summary>
/// <param name="width"></param>
/// <param name="height"></param>
/// <param name="gbackground"></param>
/// <param name="landHeight"></param>
private static void DrawGround(int width, int height, Graphics gbackground, int landHeight)
{
	using SolidBrush grassbrush = new(Color.FromArgb(130, 150, 150, 155));

	using Pen penGrassLine = new(Color.FromArgb(80, 200, 200, 200));
	penGrassLine.DashStyle = System.Drawing.Drawing2D.DashStyle.Dot;

	gbackground.FillRectangle(grassbrush, 0, height - landHeight, width, height);

	// vertical diagonal grass lines
	for (int diagonalLineX = -25; diagonalLineX < 25; diagonalLineX++)
	{
		gbackground.DrawLine(penGrassLine, width / 2 + diagonalLineX * 40, height - landHeight, width / 2 + diagonalLineX * 100, height);
	}

	int t = 10;

	// horizontal grass lines
	for (int horizontalLineY = 0; horizontalLineY < 11; horizontalLineY++)
	{
		gbackground.DrawLine(penGrassLine, 0, height - landHeight + horizontalLineY * t, width, height - landHeight + horizontalLineY * t);
		t += 2;
	}
}

/// <summary>
/// Draw stars of varying size and brightness on the background.
/// </summary>
/// <param name="width"></param>
/// <param name="height"></param>
/// <param name="gbackground"></param>
/// <param name="landHeight"></param>
private static void DrawStars(int width, int height, Graphics gbackground, int landHeight)
{
	// add some stars in the form of "blobs" varying in size
	for (int stars = 0; stars < 800; stars++)
	{
		int diameterOfStar = RandomNumberGenerator.GetInt32(1, 5);
		Point positionOfStarInSky = new(RandomNumberGenerator.GetInt32(0, width), RandomNumberGenerator.GetInt32(0, height - landHeight - 70));

		gbackground.FillEllipse(new SolidBrush(Color.FromArgb(RandomNumberGenerator.GetInt32(2, 120) + 5, 255, 255, 255)),
								positionOfStarInSky.X, positionOfStarInSky.Y,
								diameterOfStar, diameterOfStar);
	}
}

/// <summary>
/// Returns the offset for a base from its' index.
/// </summary>
/// <param name="baseIndex"></param>
/// <returns></returns>
internal static float GetBaseOffset(int baseIndex)
{
	return baseIndex * 300 + 200;
}
Frames use the following to avoid repeated re-drawing of the background image in each frame:
// we use the pre-drawn image behind each "frame". We draw it once and cache.
Bitmap? scenery = WorldBackground.GetScenery();

Bitmap bitmapCanvas = new(scenery); // start with our pre-drawn image and overlay rockets

using Graphics g = Graphics.FromImage(bitmapCanvas);
There you have it – a box-rocket and background!
I hope you feel more inspired to create beautiful applications. If just one of you feels that way, this post was worth it.