In my previous Missile Command post, I explained I only trained it to just 69% accuracy. I was pretty confident at some point it would be picked up by a reader, and although it beats a human every time without 100% accuracy they would consider it in some way deficient.
I felt it would be helpful to post this to pre-empt and tackle the question openly.
Let’s revisit why the Missile Command neural network fails to be 100% accurate.
Launch Angle
Manpad/Stingers require the user to point the device at the designated target, and in doing so the missile is launched at an angle where it points accurately in the right direction. ABMs generally do not, because if you’re engaging a honking big nuke that close to the ground you’ve left it too late.
In the first version, I had gravity and wind enabled (as with HITile), and I found that failing to launch upwards meant it fell out of the sky before it had built up speed. The code, therefore, applies a limit of +/- 45 degrees. Stingers and others lob the missile out the launch tube with some force so that they have time for the rocket motor to engage before it falls out of the sky.
Simple to change, although missiles are recessed slightly, and ploughing through the silo edges wouldn’t be playing fair. And we don’t need it to be any more accurate.
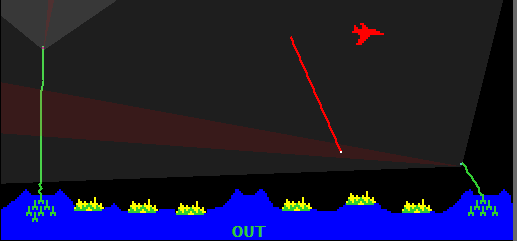
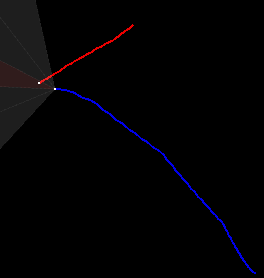
When an ICBM is dropped from a bomber (plane), it starts low and invariably it goes vertically down like in the picture above. By the time the missile is engaged, you’re accelerating upwards and would need to do a very sharp change in angle. This leads to what I call a banana shot – a missile that engages and curves but loses sight of the target. This is then followed by another ABM, and quickly you chew up your limited supply of ABMs. The net result is you run out before the ICBMs are done pummelling you. Bases are lost and the game is over quicker.
Training
This was my 2nd ML creation, and resting on the success of ML driving I naively adopted a genetic algorithm.
I hope after playing it, you’ll appreciate that whilst it gets a “fail” from wiser me, it doesn’t detract from a fun game.
But we can do better, and that’s what this post is primarily about.
Let’s see some examples of v2.0
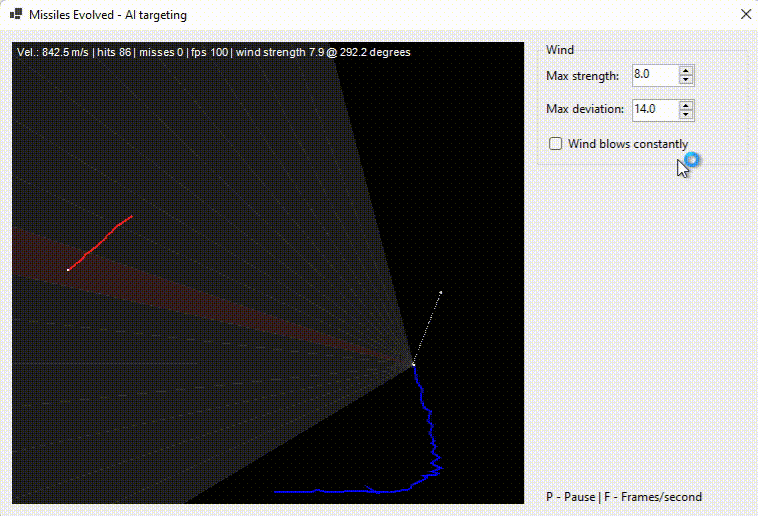
Representing “wind” direction and strength in a meaningful way resulted in the white dotted arrow, I call it a “Wind-o-Meter”. I considered wavy lines and other approaches, but this seemed adequate.
#1 a relatively strong variable wind that blows constantly from left to right. It is so strong that from the moment of launch the missiles are blown right; as the missile accelerates it overcomes the wind and despite various deflections from the wind, it still hits the target.
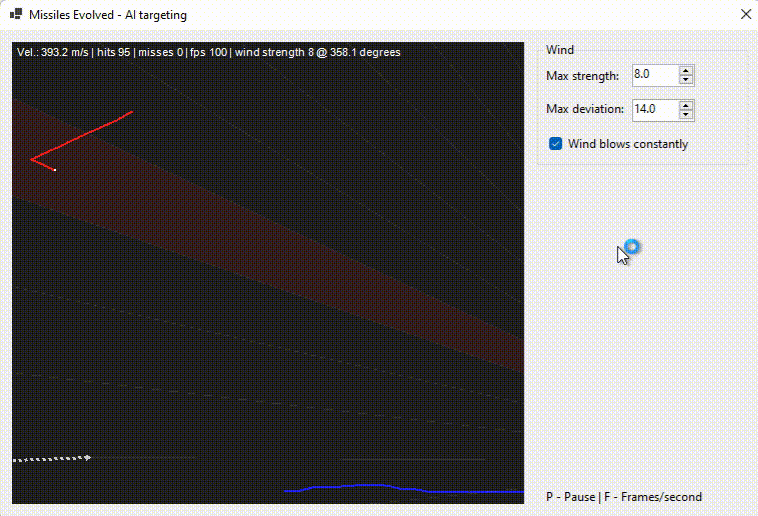
#2 a fairly strong wind but not blowing constantly; the wind can vary in any direction as a result the path is very erratic. But the missiles aren’t deterred by it, taking continuous corrective adjustments and finding their target.
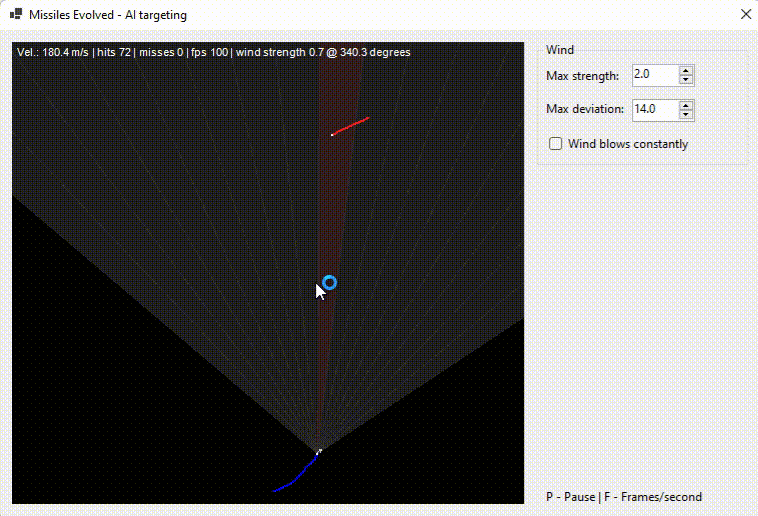
#3 a weak wind; the path is quite smooth.
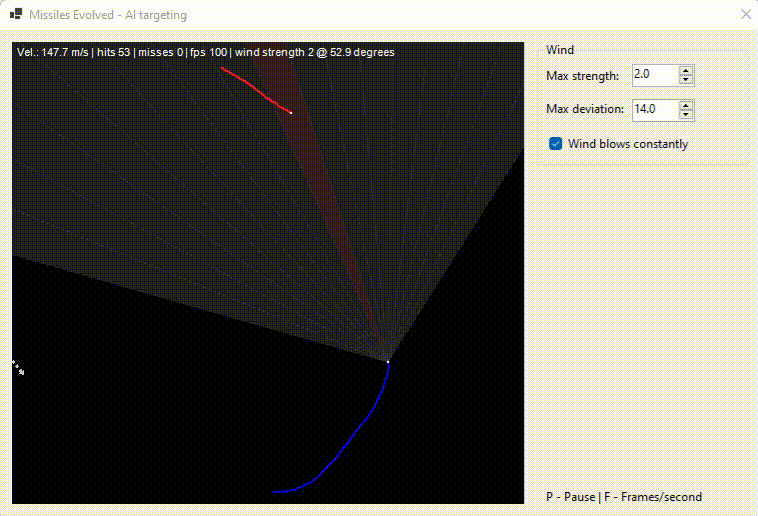
#4, a weak but constant wind blowing from left to right. The rocket is blown side ways but deals with it.
I call it a HITile rather than MISSile because most of the time it hits despite the odds stacked against it. If you whack up the strength and deviation to excess, it will miss sometimes.
The source code can be found on GitHub.
This is one of those examples where ML/AI is complete overkill.
AI should only be considered when all else has been tried.
I don’t know who said it, but they were very smart.
So why then did I use ML?
Firstly because my original Missile Command post used it, and secondly because I want to prove ML can do better. I can thus show you where the ML takes us, and how if you know what it’s doing you can simplify the approach.
Neural network configuration
I have 17 sensors, so 17 input neurons. This task doesn’t require hidden neurons.
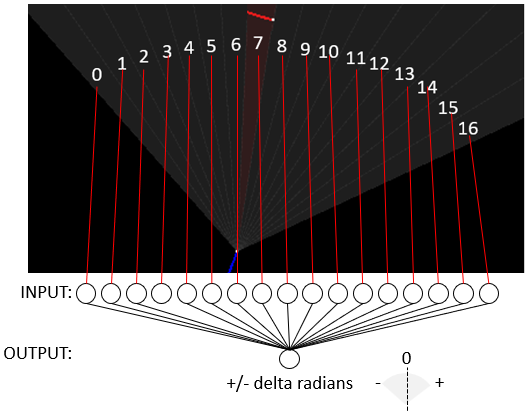
Note: The sensors detect the ICBM within their “quadrant”. They are not identifying where in that quadrant, just that an ICBM is present. They don’t detect distance. It’s a “1” if the ICBM is present in the quadrant or “0” if it is not.
You might be wondering why I chose 17 sensors and why not go all in and communicate distance from the input sensor? Why 0 hidden neurons?
It was the result of experimentation, and evolving the approach. Part of the fun is working out what works and what doesn’t and then understanding the why. In this instance, the answer to why “17” sensors, was because the sweep is quite wide. Whilst writing this posting I tried it with 3, and that was a “nope” – it seemed to spin out of control. However it works well with just 5 sensors, as can be seen below:
The closer the ABM gets to the ICBM, the smaller the quadrant area is, hence why targeting works adequately. I would still argue the increased sensor resolution improves the likelihood of a hit as it is making more accurate adjustments from a greater distance.
I chose not to use distance because after due consideration I felt the demand from the ABM is to accurately steer towards the ICBM at all times; the distance doesn’t change the urgency. After trying both, I opted to exclude distance.
Lastly, the number of hidden neurons is indicative of the task at hand. The first attempt had the same number of hidden as the input. You’ll find various pieces of advice on the internet, some offer formulas and others suggest somewhere between the input and output. But once you’ve thought about how it actually works, you quickly realise the task is linear, and hidden neurons don’t improve anything.
What’s the approach then?
If I had to tell you how to steer the missile my instructions would be very simple:
- If the ICBM illuminates sensor zero, turn left -50 degrees.
- If the ICBM illuminates sensor one, turn left -47 degrees.
- ..
- If the ICBM illuminates sensor 8, don’t turn
- ..
- If the ICBM illuminates sensor fifteen, turn right 47 degrees
- If the ICBM illuminates sensor sixteen, turn right 50 degrees
Why would an algorithm (ML or not) do it any different?
Here’s the rub. I achieved my goal using “neurons” and then looked at what the train had achieved, and it had done the above (albeit due to the quadrants being 2 angles the result is slightly imbalanced, but not in a material way.
The training data looks like this:
(128,6)-(304.95627-154.48393) 0|0|0|0|0|0|0|0|0|0|0|0|0|0|0|0|1 thetaRad=0.8726646491402315 thetaDeg=50.000001326000046
(128,6)-(296.58627-163.92299) 0|0|0|0|0|0|0|0|0|0|0|0|0|0|0|1|0 thetaRad=0.8180450034826174 thetaDeg=46.870526151318714
(128,6)-(278.39487-181.33505) 0|0|0|0|0|0|0|0|0|0|0|0|0|0|1|0|0 thetaRad=0.7089801944990417 thetaDeg=40.62157290315932
(128,6)-(258.4163-196.66356) 0|0|0|0|0|0|0|0|0|0|0|0|0|1|0|0|0 thetaRad=0.5999154355754236 thetaDeg=34.37262252322421
(128,6)-(236.8853-209.72774) 0|0|0|0|0|0|0|0|0|0|0|0|1|0|0|0|0 thetaRad=0.49083779385969906 thetaDeg=28.122934013673067
(128,6)-(214.05836-220.37108) 0|0|0|0|0|0|0|0|0|0|0|1|0|0|0|0|0 thetaRad=0.3817521176953933 thetaDeg=21.87278516412751
(128,6)-(190.20844-228.46597) 0|0|0|0|0|0|0|0|0|0|1|0|0|0|0|0|0 thetaRad=0.27266671597690517 thetaDeg=15.622652039169
(128,6)-(165.61893-233.91624) 0|0|0|0|0|0|0|0|0|1|0|0|0|0|0|0|0 thetaRad=0.16358106301616582 thetaDeg=9.372504519089862
(128,6)-(140.58232-236.65707) 0|0|0|0|0|0|0|0|0|0|0|0|0|0|0|0|0 thetaRad=0.05449589217017903 thetaDeg=3.1223846221512868
(128,6)-(115.396614-236.65593) 0|0|0|0|0|0|0|1|0|0|0|0|0|0|0|0|0 thetaRad=-0.054587216071015465 thetaDeg=-3.127617096237886
(128,6)-(90.36028-233.91281) 0|0|0|0|0|0|1|0|0|0|0|0|0|0|0|0|0 thetaRad=-0.16367228237227405 thetaDeg=-9.377731003204765
(128,6)-(65.77128-228.4603) 0|0|0|0|0|1|0|0|0|0|0|0|0|0|0|0|0 thetaRad=-0.2727579095707313 thetaDeg=-15.627877047213868
(128,6)-(41.922047-220.3632) 0|0|0|0|1|0|0|0|0|0|0|0|0|0|0|0|0 thetaRad=-0.3818435253316086 thetaDeg=-21.87802243589791
(128,6)-(19.096096-209.71779) 0|0|0|1|0|0|0|0|0|0|0|0|0|0|0|0|0 thetaRad=-0.4909291096350641 thetaDeg=-28.12816602220445
(128,6)-(-2.4336948-196.65164) 0|0|1|0|0|0|0|0|0|0|0|0|0|0|0|0|0 thetaRad=-0.6000067699104998 thetaDeg=-34.377855595148716
(128,6)-(-22.410868-181.32133) 0|1|0|0|0|0|0|0|0|0|0|0|0|0|0|0|0 thetaRad=-0.7090714514032088 thetaDeg=-40.62680153861952
(128,6)-(-40.600704-163.90758) 1|0|0|0|0|0|0|0|0|0|0|0|0|0|0|0|0 thetaRad=-0.8181364136039648 thetaDeg=-46.875763565476696
The data is tiny, it doesn’t need to be large, just sufficient for our purpose and is easily generated by code, the format is:
(x,y) of ABM - (x,y) of ICBM sensor0|sensor1|sensor2|sensor3|sensor4|sensor5|sensor6|sensor7|sensor8|sensor9|sensor10|sensor11|sensor12|sensor13|sensor14|sensor15|sensor16 thetaRad=(angle to rotate in RADIANS) thetaDeg=(angle to rotate in DEGREES)
During training, it outputs every 1000 epoch (generations) whether it was successfully trained or if not, what deviation is from the expected output. Successfully trained is defined by how the deviation is below an acceptable accuracy threshold.
epoch 0.
epoch 1000.
epoch 1000. item: 1 deviation: 0.0504570276619688
epoch 2000.
epoch 2000. item: 1 deviation: 0.01747038403713219
epoch 3000.
epoch 3000. item: 1 deviation: 0.007049680581945661
epoch 4000.
epoch 4000. item: 1 deviation: 0.0028593548683387704
epoch 5000.
epoch 5000. item: 1 deviation: 0.0010652354418931864
epoch 6000.
epoch 6000. item: 9 deviation: 0.002361048773593305
epoch 7000.
epoch 7000. item: 9 deviation: 0.0014055413268264094
epoch 7671.
TRAINED
After training it outputs the result:
0 0 0 0 0 0 0 0 0 0 0 0 0 0 0 0 1 = 0.873 Deviation from desired value: 0
0 0 0 0 0 0 0 0 0 0 0 0 0 0 0 1 0 = 0.818 Deviation from desired value: 0
0 0 0 0 0 0 0 0 0 0 0 0 0 0 1 0 0 = 0.709 Deviation from desired value: 0
0 0 0 0 0 0 0 0 0 0 0 0 0 1 0 0 0 = 0.6 Deviation from desired value: 0
0 0 0 0 0 0 0 0 0 0 0 0 1 0 0 0 0 = 0.491 Deviation from desired value: 0
0 0 0 0 0 0 0 0 0 0 0 1 0 0 0 0 0 = 0.382 Deviation from desired value: 0
0 0 0 0 0 0 0 0 0 0 1 0 0 0 0 0 0 = 0.273 Deviation from desired value: 0
0 0 0 0 0 0 0 0 0 1 0 0 0 0 0 0 0 = 0.164 Deviation from desired value: 0
0 0 0 0 0 0 0 0 0 0 0 0 0 0 0 0 0 = 0.053 Deviation from desired value: 0.001
0 0 0 0 0 0 0 1 0 0 0 0 0 0 0 0 0 = -0.055 Deviation from desired value: 0
0 0 0 0 0 0 1 0 0 0 0 0 0 0 0 0 0 = -0.164 Deviation from desired value: 0
0 0 0 0 0 1 0 0 0 0 0 0 0 0 0 0 0 = -0.273 Deviation from desired value: 0
0 0 0 0 1 0 0 0 0 0 0 0 0 0 0 0 0 = -0.382 Deviation from desired value: 0
0 0 0 1 0 0 0 0 0 0 0 0 0 0 0 0 0 = -0.491 Deviation from desired value: 0
0 0 1 0 0 0 0 0 0 0 0 0 0 0 0 0 0 = -0.6 Deviation from desired value: 0
0 1 0 0 0 0 0 0 0 0 0 0 0 0 0 0 0 = -0.709 Deviation from desired value: 0
1 0 0 0 0 0 0 0 0 0 0 0 0 0 0 0 0 = -0.818 Deviation from desired value: 0
As you can see after the 7671 generations, it has trained to an acceptable accuracy (only sensor 8 is slightly out but within tolerance). You can also see how it’s been taught in the same way I mentioned I would explain it to a human. Also notice the imbalance in “0”, where 1 and 15, 2 and 14, 3 and 13 etc are opposites (give or take a small amount).
Training data was created as follows.
MathUtils.PtInTriangle() is used to ensure any training point is very much within the cone. Whilst developing I made a pig’s ear of it and couldn’t get the ML to ever train. It took a while to realise. I cannot emphasise enough the importance of ensuring training data is accurate. My advice is to ensure you have safety checks like this.
TrainingDataPoints.Reset();

TargetsInCone = new();

while (TrainingDataPoints.GetPoints(Cone, out PointA icbm))
{
  // if the training point isn't within the heat sensor cone, skip it.
  if (!MathUtils.PtInTriangle(icbm, Cone[0], Cone[1], Cone[2])) continue;

  double[] output = sensor.Read(0, locOfABM, icbm);

  TargetsInCone.Add(icbm);

  // missile needs to go from (128,6)->(x,y). We compute the angle, and teach the AI to
  // associate the sensor quadrant output with that angle.
  double angle = Math.Atan2(
                    -(icbm.AltitudeInMissileCommandDisplayPX - locOfABM.AltitudeInMissileCommandDisplayPX),
  		     (icbm.HorizontalInMissileCommandDisplayPX - locOfABM.HorizontalInMissileCommandDisplayPX));

  angle += Math.PI / 2; // make it relative to 0.

  trainingData.Add(new TrainingData(input: output, output: new double[] { angle }));
}

successFullyTrained = networkMissile.Train(
                        trainingData.ToArray(),
                        maxError: 0.001, // 0.011F, // maximum deviation we'll tolerate
			checkAfter: 1000,
			maxAttempts: 2000000);
My “Train()” iterates over training data using back-propagation (sensors+expected output).
For those unfamiliar with it, Math.Atan2() returns the angle based on y and x, not to be confused with Math.Atan(). We use it to work out the angle from ABM to ICBM.
One thing to note is Cartesian vs. Bitmap vs. Missile Command. The convention is 0,0 is the bottom left for Cartesian coordinates and this is also true of the Missile Command display. Bitmaps work in raster lines with 0,0 at the top. This can cause strange mistakes relating to angles. “PointA” handles inverting of coordinates, and we use “Altitude/Horizontal…” instead of x and y to avoid ambiguity.
To add to our woes, we want 0 radians/degrees to point upwards as that’s how the ABMs move. But that too is not the norm, with 0 being to the right, and degrees going anticlockwise. In the above code, we add 90 degrees (Math.PI/2).
That covers the actual creation of the training data from points (turning ICBM training points into sensor outputs, and computing the angle to rotate).
Creating raw training points is simple mathematics employing sine and cosine to rotate a point. It’s a shame I don’t get revenue each time I use them.
internal static PointA[] GenerateTrainingPoints()
{
	trainingPoints = new List<PointA>();

        // we don't want multiple points giving slightly different angles as it is then non-backpropagate'able.
	List<string> listOfSensorValuesAlreadyAddedToList = new();

	IRSensorLeftRight sensor = new();

	for (float angle = -50; angle <= 50; angle += 0.01f)
	{
		// cone starts -50 degrees to + 50 degrees. Cos & Sin rotate a radius about an angle
		float x = (float)(128f + 231f * Math.Cos(MathUtils.DegreesInRadians(angle + 90)));
		float y = (float)(6f + 231f * Math.Sin(MathUtils.DegreesInRadians(angle + 90)));

		// if the ICBM is at x,y and ABM at 128,6 what heat signature does it see?
		double[] output = sensor.Read(0, new PointA(128, 6), new PointA(x, y));

		// We do this because if we have multiple rows for the SAME 1's & 0's with a different angle it'll never train.
		// We actually don't even care which one it picks, it's plenty accurate enough as the tiny part of the cone
		// reaches the target
		string s = string.Join("-", output);

		if (listOfSensorValuesAlreadyAddedToList.Contains(s)) continue;

		listOfSensorValuesAlreadyAddedToList.Add(s);

		// this is a unique training point
		trainingPoints.Add(new PointA(x, y));
	}

	// we need an array so we can step thru them sequentially
	return trainingPoints.ToArray();
}
Our sensor works from +/-50 degrees (configured in IRSensorLeftRight class).
Imagine a circle, we care about an arc from -50 to +50 when measuring from the top (so we need to add 90 degrees to turn 0 right into 0 up). Using the radius we compute points on the arc. We ask the sensor for output for that point. It will give us 17 outputs, all 0 except a “1” in the quadrant that contains the ICBM.
It’s important to be careful to not associate the output angle with multiple inputs. Yes, I made that mistake before you ask. So we are careful to keep a list of the ones we’ve added and ignore additional training points. This also benefits us as the fewer training points the quicker it learns…
Doing it without AI/ML
OK. I mentioned you don’t need AI/ML to do this.
// the sensor tells us which quadrant the heat was found in
double[] output = abmHeatSensor.Read(angleInDeg, abmLocation, icbmLocation);

#if USING_AI
  // it's the "offset" angle that is returned. Physical angles won't work as we're rotating the missile
  // and in doing so orientation changes.
  abmAngleinRadians += AccurateABM.networkMissile.FeedForward(output)[0];
#else
  abmAngleinRadians += MappingBasedGuidanceSystem(output);
#endif
If you uncomment the #define in FormMissilesEvolved.cs, it will use the “mapping” equivalent.
private static double MappingBasedGuidanceSystem(double[] outputFromHeatSensor)
{
  // because our table is hard-coded, we aren't flexible on this. If you want one with more or less, then
  // copy the AI output per segment into this array.
  if (outputFromHeatSensor.Length != 17) throw new ArgumentOutOfRangeException(nameof(outputFromHeatSensor), "This guidance expects 17 heat sensors");

  // how much the ABM needs to rotate for each sensor
  float[] mapOfAngleToRotateRelativeToHeatSensor = new float[17] { -0.819f, -0.709f, -0.6f, -0.491f, -0.382f, -0.273f, -0.164f, -0.054f, 0.054f, 0.164f, 0.273f, 0.382f, 0.491f, 0.6f, 0.709f, 0.818f, 0.871f };

  // whichever has a "1" indicates that particular sensor has spotted the ICBM
  for (int i = 0; i < outputFromHeatSensor.Length; i++)
  {
    if (outputFromHeatSensor[i] == 1) return mapOfAngleToRotateRelativeToHeatSensor[i]; // this will make it rotate
  }

  return 0; // on target requiring no deviation OR target is outside the sensor cone.
}
You might be thinking “that works?” Well, yes. Just as well as any neural network.
Whichever sensor has a “1”, we look up the angle to rotate the missile (relative to the current direction). And I didn’t need AI/ML to compute the angles to rotate, as I trained it based on the angle to return.
It would be logical to think it doesn’t know where it is in the world, the speed it is travelling, the direction it is pointing and yet it overcomes gravity, how come? Because the “solution” simply requires it to adjust its orientation based on the sensor. When you’ve been told the answer it seems obvious, but I’ll be honest and say I made a rookie mistake thinking these might help!
I love how cool it works, and the simplicity!
Thankfully knowing this makes you no more likely to cause havoc in the world. Concepts might be relevant, but making real missiles takes a lot of clever engineering, and I’m afraid even if I knew how I wouldn’t be sharing publicly.
What I hope is that you are mindful that there is often a simpler way to solve some problems without ML. It may be simpler than you imagine.
Was this post interesting? Can you improve on the approach? Please let me know in the comments section.